How to Fund your Crypto Wallet With a Credit Card


GoCryptoMe makes donating to Charitable Crowdfunding Campaigns simpler and safer than ever before. Thanks to our decentralized platform, there are no long and complicated registrations and you can stay completely anonymous while donating.
To make a meaningful contribution, all you’ll need is a funded crypto wallet. If you don’t have a crypto wallet yet, no worries, you can follow our helpful guide on how to create a crypto wallet.
Once you have your crypto wallet ready to go, the last thing you need to do before donating to a Charitable cause is to fund your wallet. There are several methods, however, the easiest way to fund your crypto wallet is with your credit card. In this quick guide, we’ll show you step-by-step how to fund your crypto wallet in just 5 minutes.
This guide will focus on the two most popular crypto wallets, MetaMask and TrustWallet.
How to Fund Your MetaMask Crypto Wallet Using a Credit Card
Step 1: Configure your MetaMask Wallet with the Binance Smart Chain
The GoCryptoMe Charitable Crowdfunding platform is built on the Binance Smart Chain, one the largest and most popular and affordable blockchain networks available. Because MetaMask defaults to the Ethereum blockchain network, we’ll need to configure our crypto wallet to the Binance Smart Chain before we can fund it. Fortunately this is a relatively simple process.
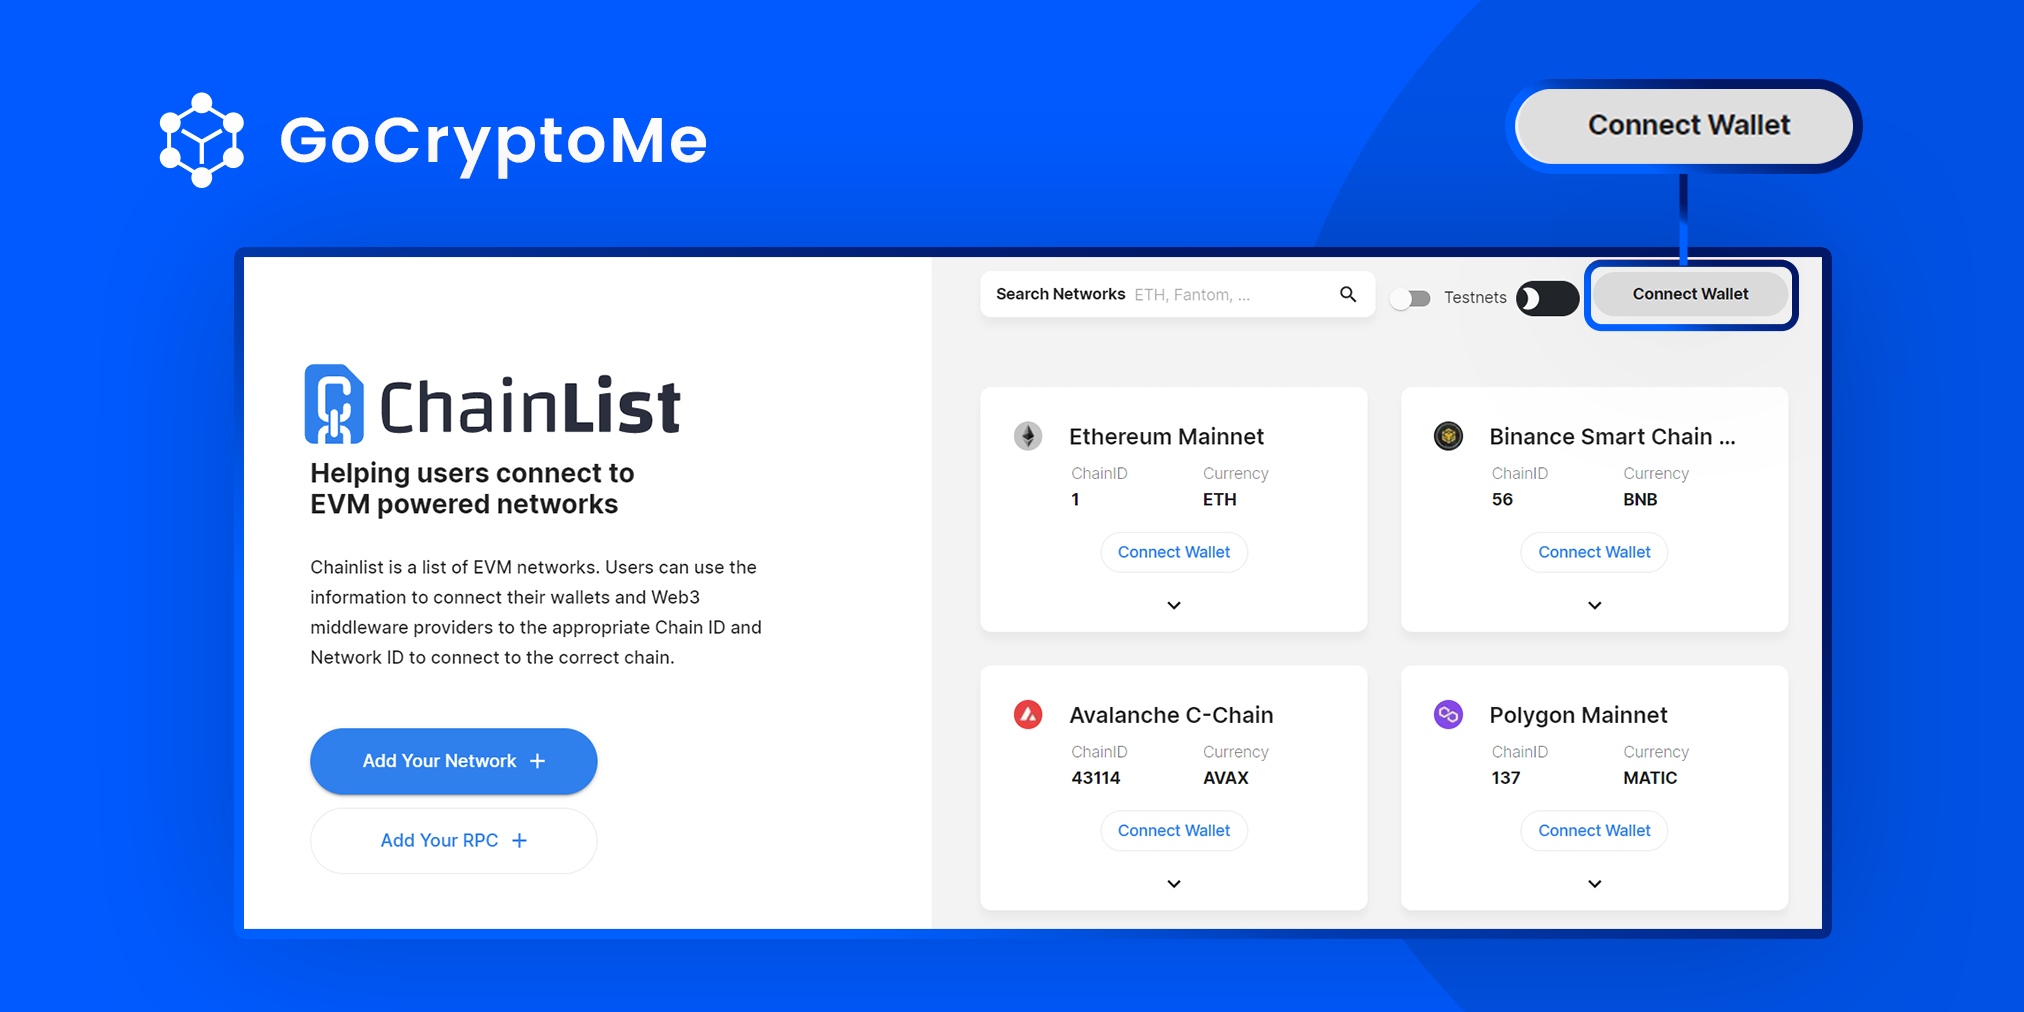
The easiest way to add the Binance Smart Chain to your MetaMask wallet is to head to https://chainlist.org/, an intuitive site that automatically adds any network to your wallet. On the Chainlist homepage, click ‘Connect Wallet’
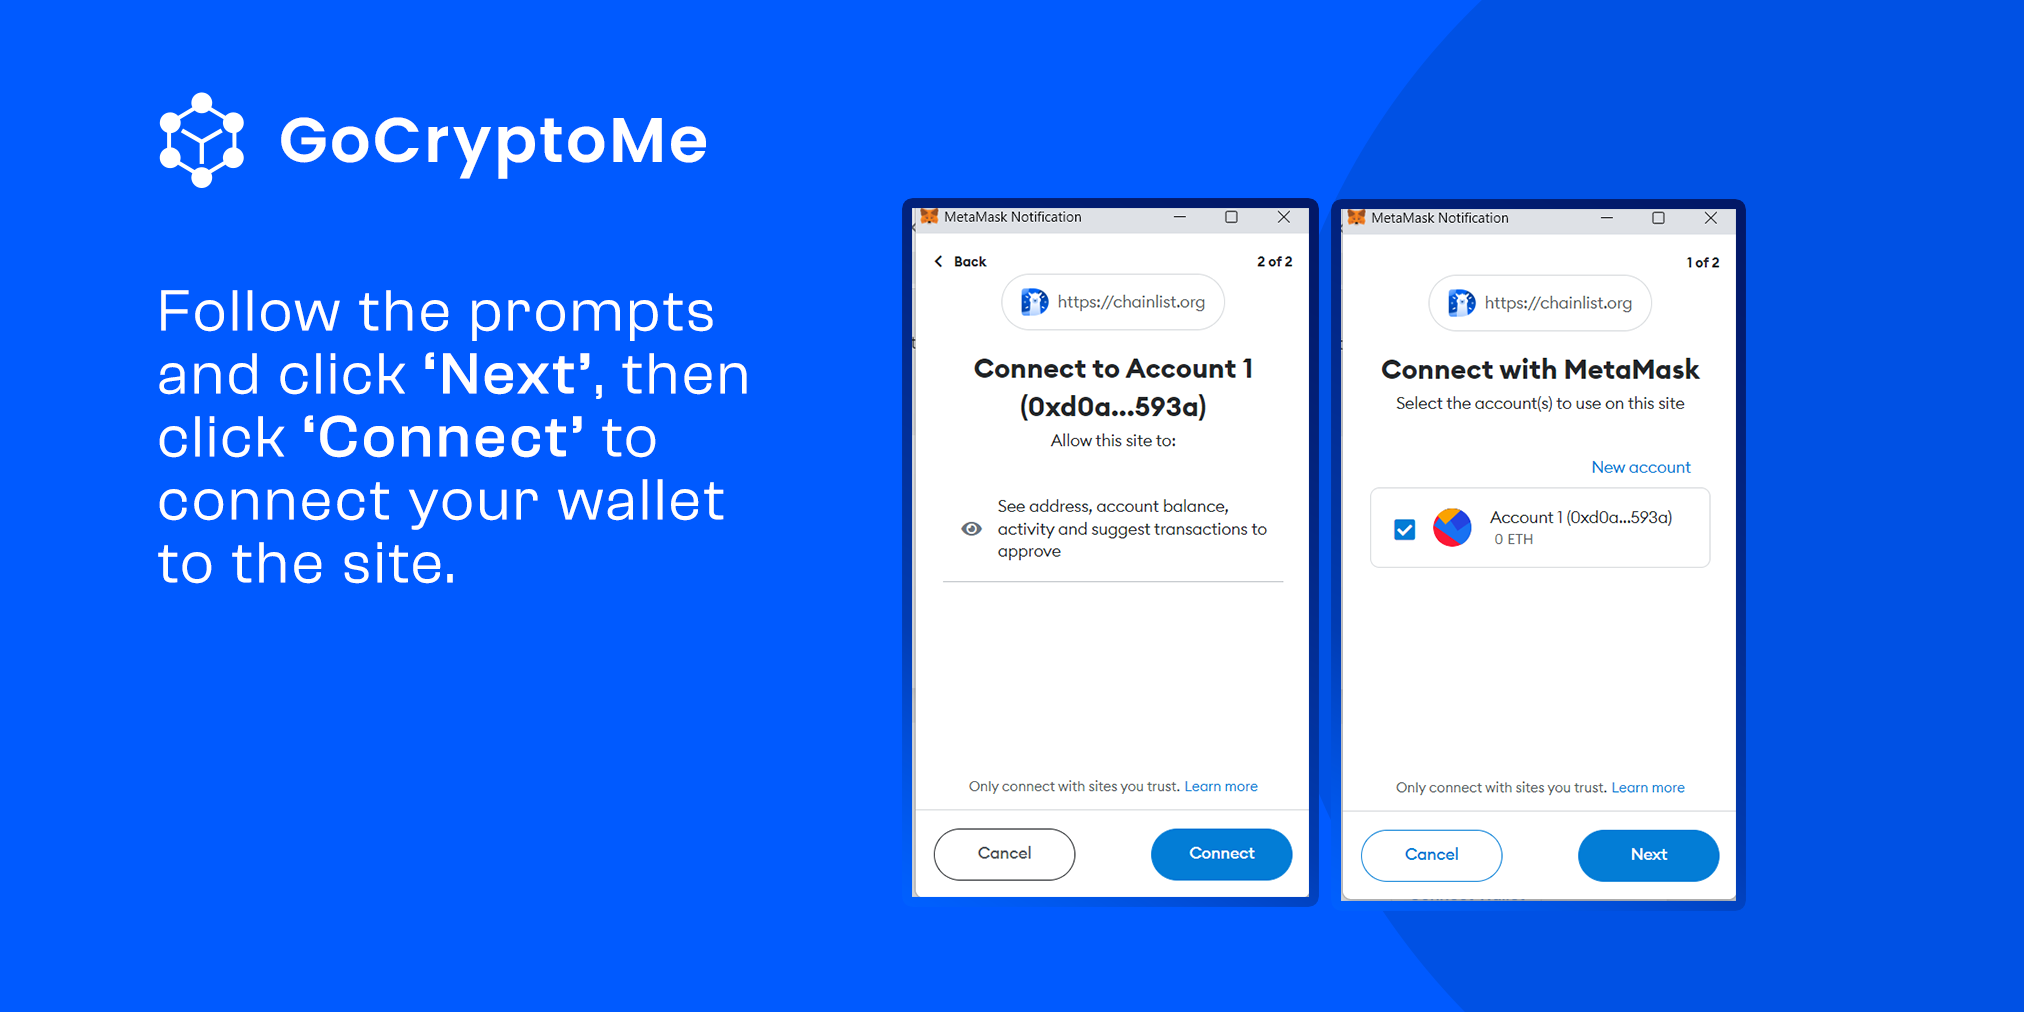
This will open the MetaMask Wallet extension in your browser. Follow the prompts and click ‘Next’, then click ‘Connect’ to connect your wallet to the site.
After you’ve connected your wallet to the site, you should see a box that says ‘Binance Smart Chain’ on the right hand side of the page. Click ‘Add To MetaMask’.
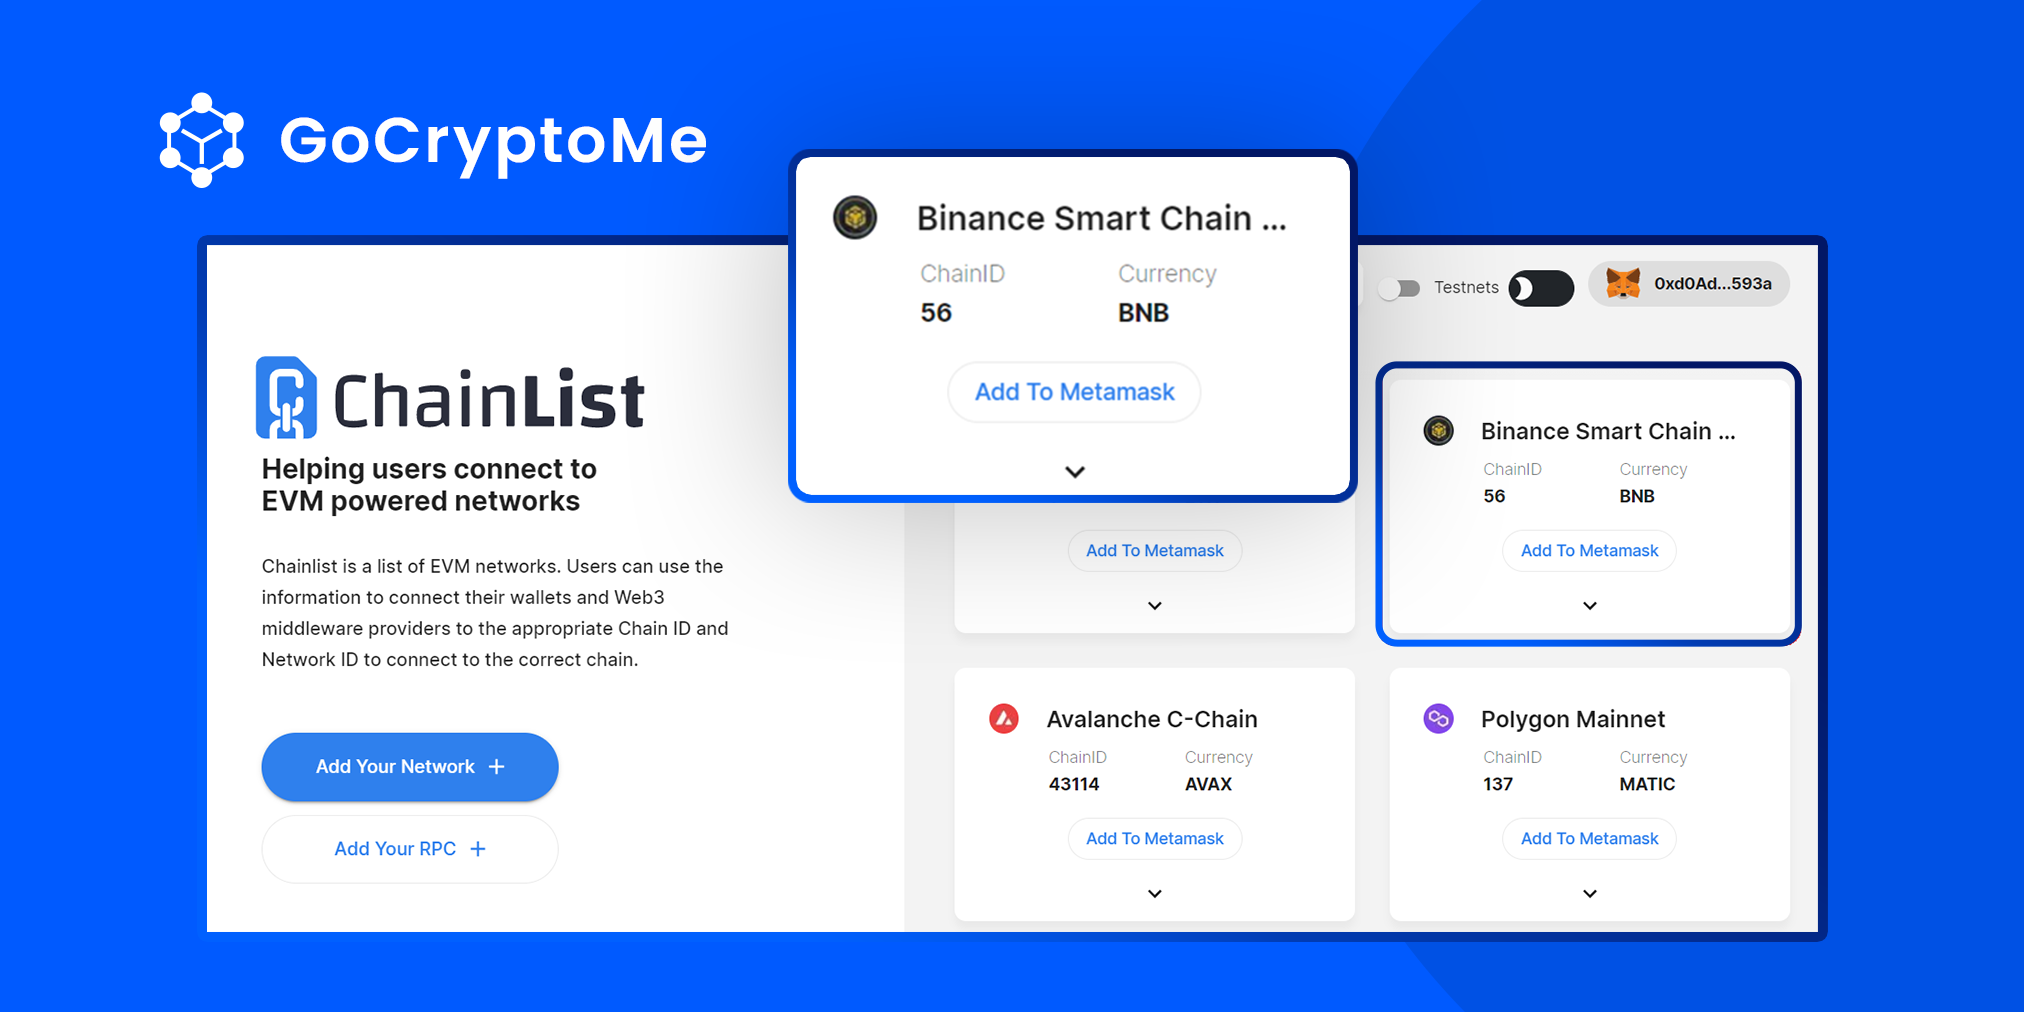
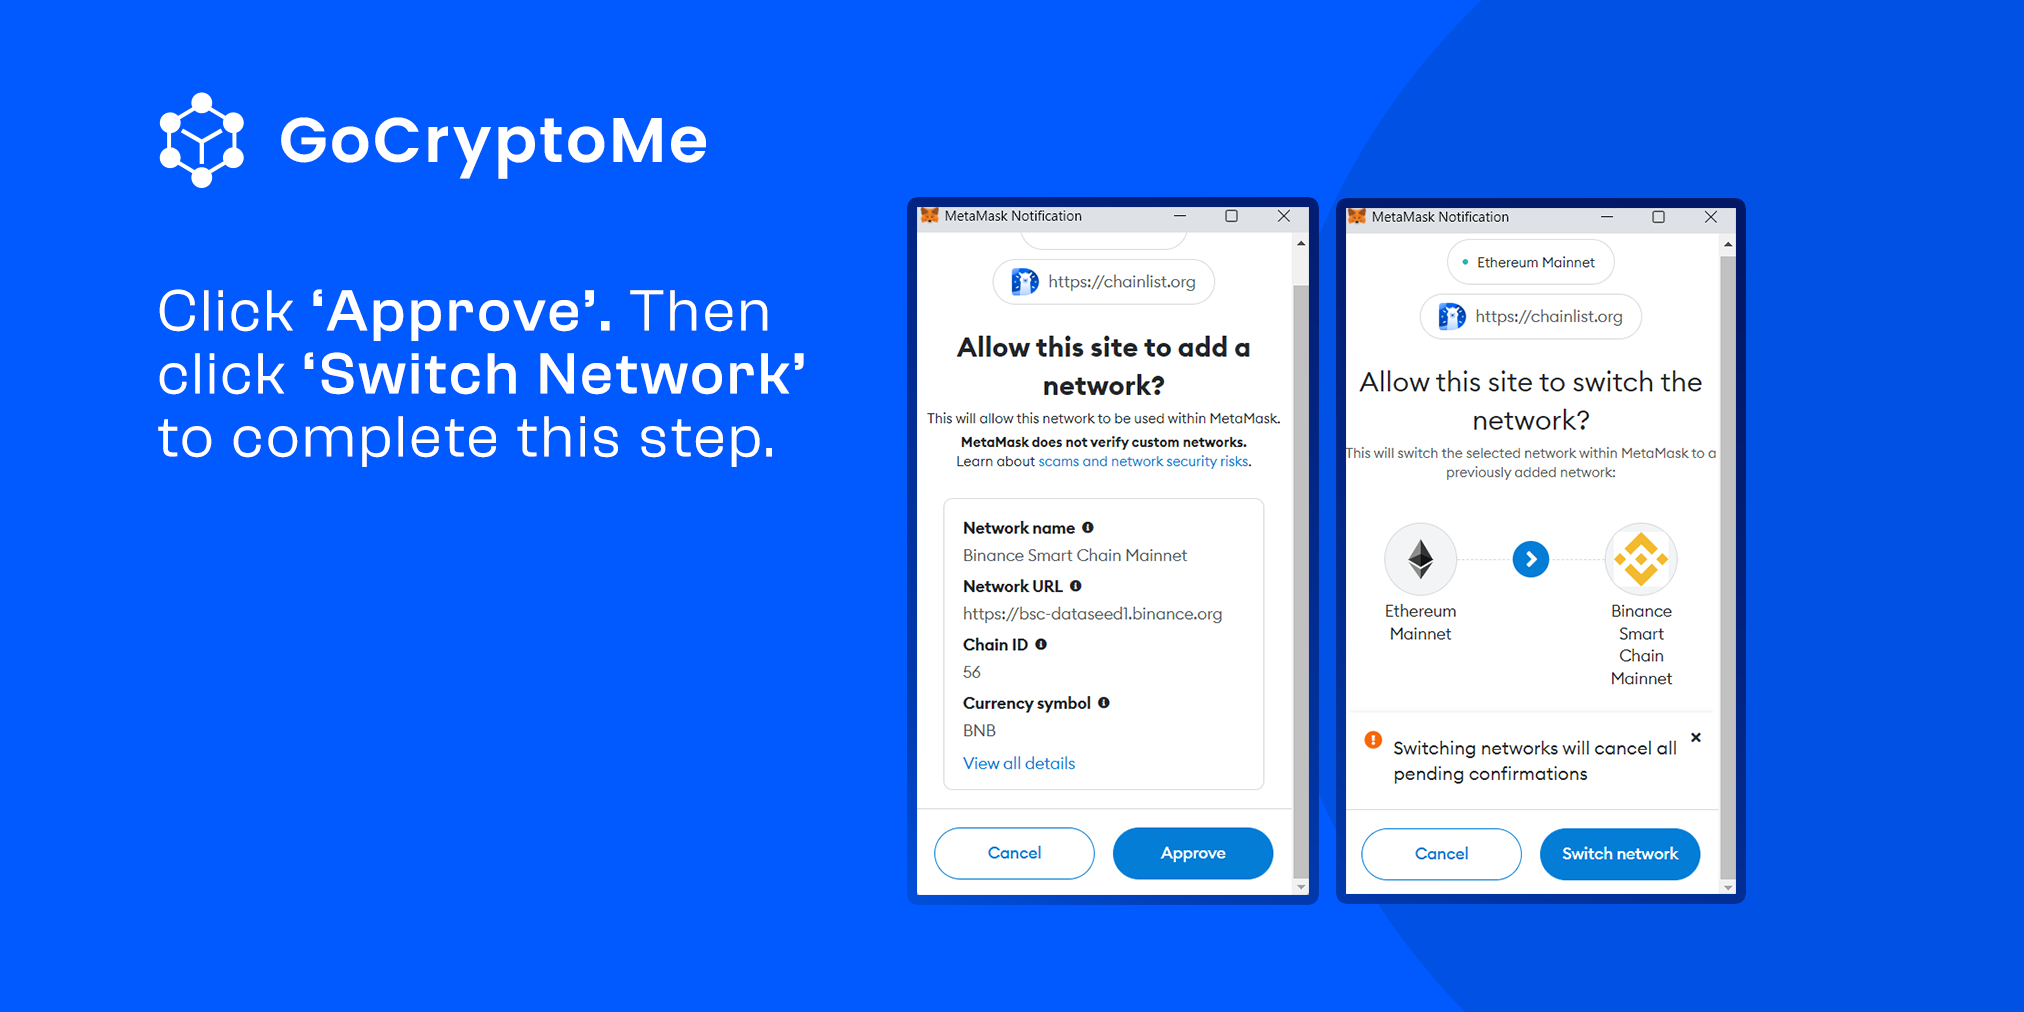
You’ll be asked if you want to add the network to your wallet, click ‘Approve’. Then on the following prompt you’ll be asked if you want to switch the Binance Smart Chain blockchain network. Click ‘Switch Network’ to complete this step.
Step 2: Prepare Your BNB Purchase
Now that you’ve successfully added the Binance Smart Chain network to your MetaMask wallet, you can buy some BNB to fund your wallet. BNB is the native cryptocurrency of the Binance Smart Chain, it’s needed to pay gas fees on the network. You can think of gas fees like tiny processing fees. They only cost a few cents, but they’re essential for the network to operate correctly.
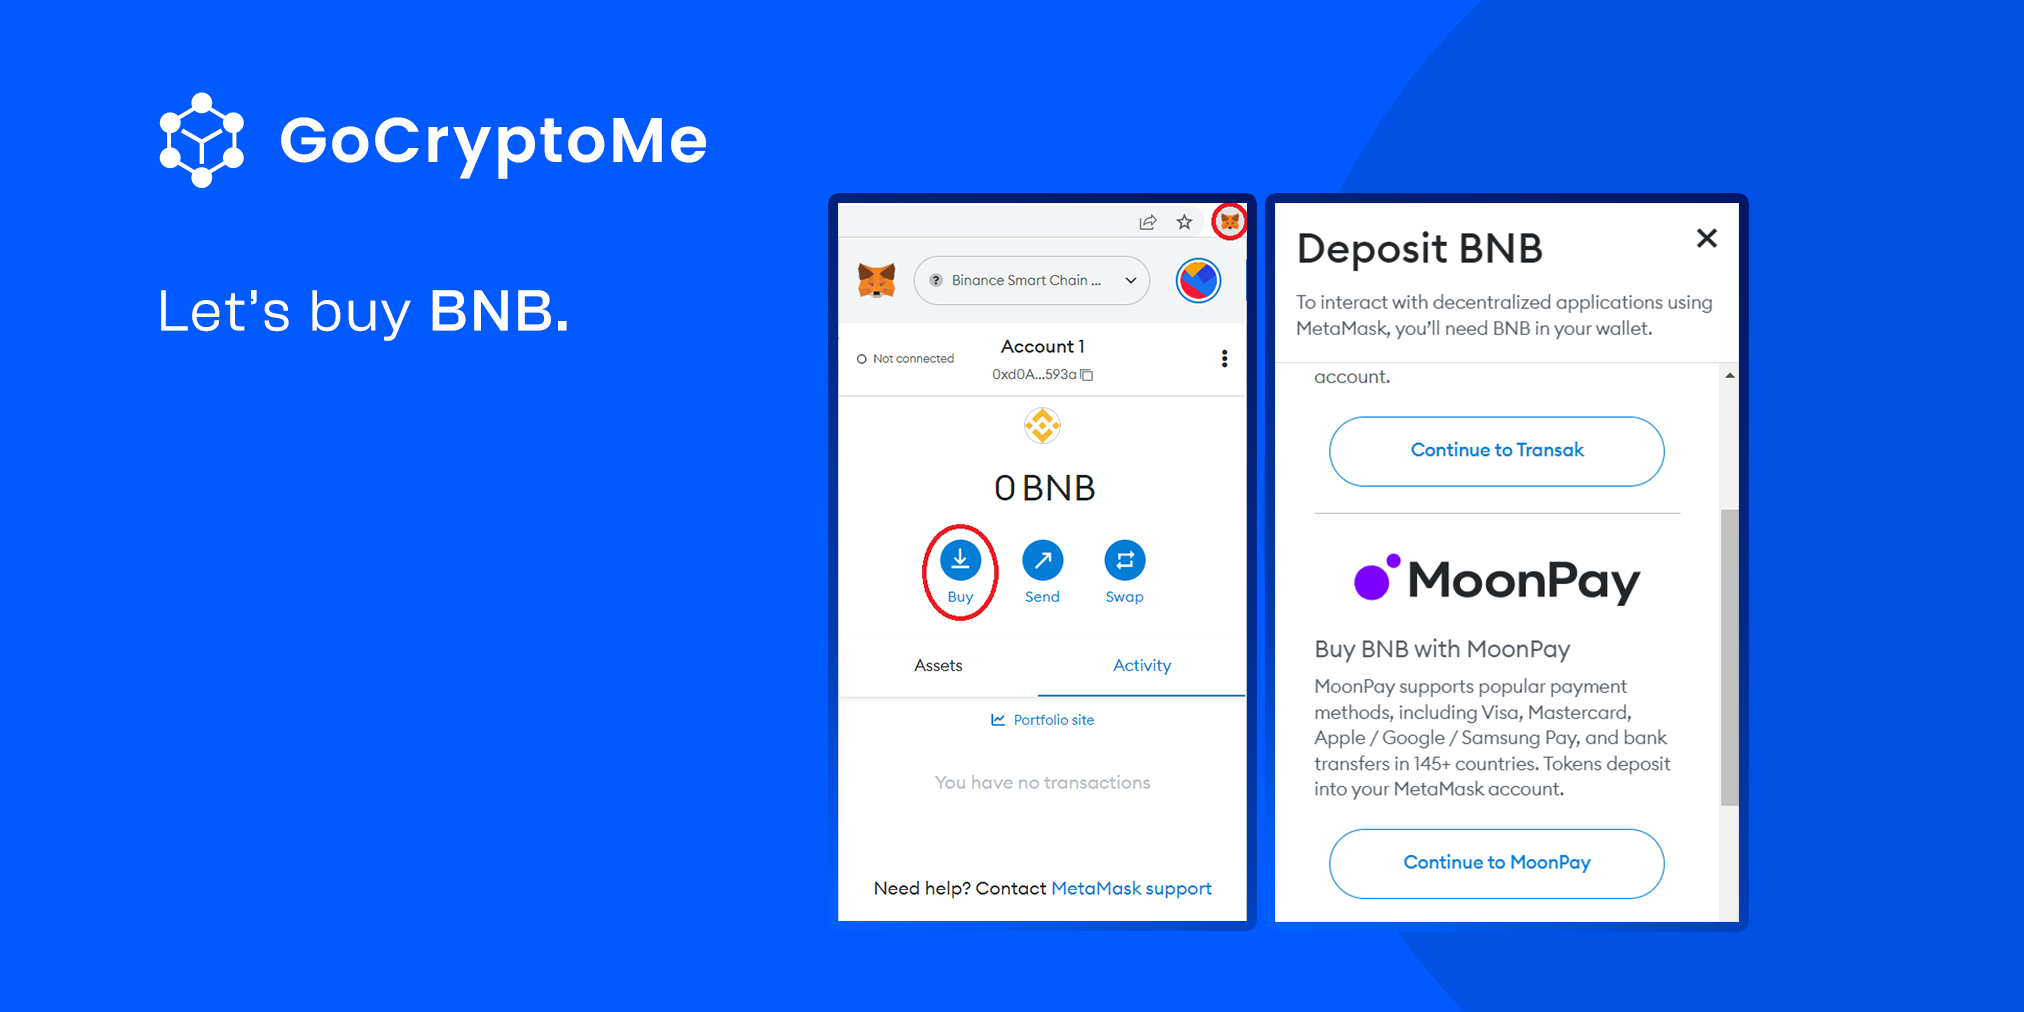
To buy BNB, open the MetaMask browser extension by clicking the icon in your browser’s taskbar, then click ‘Buy’.
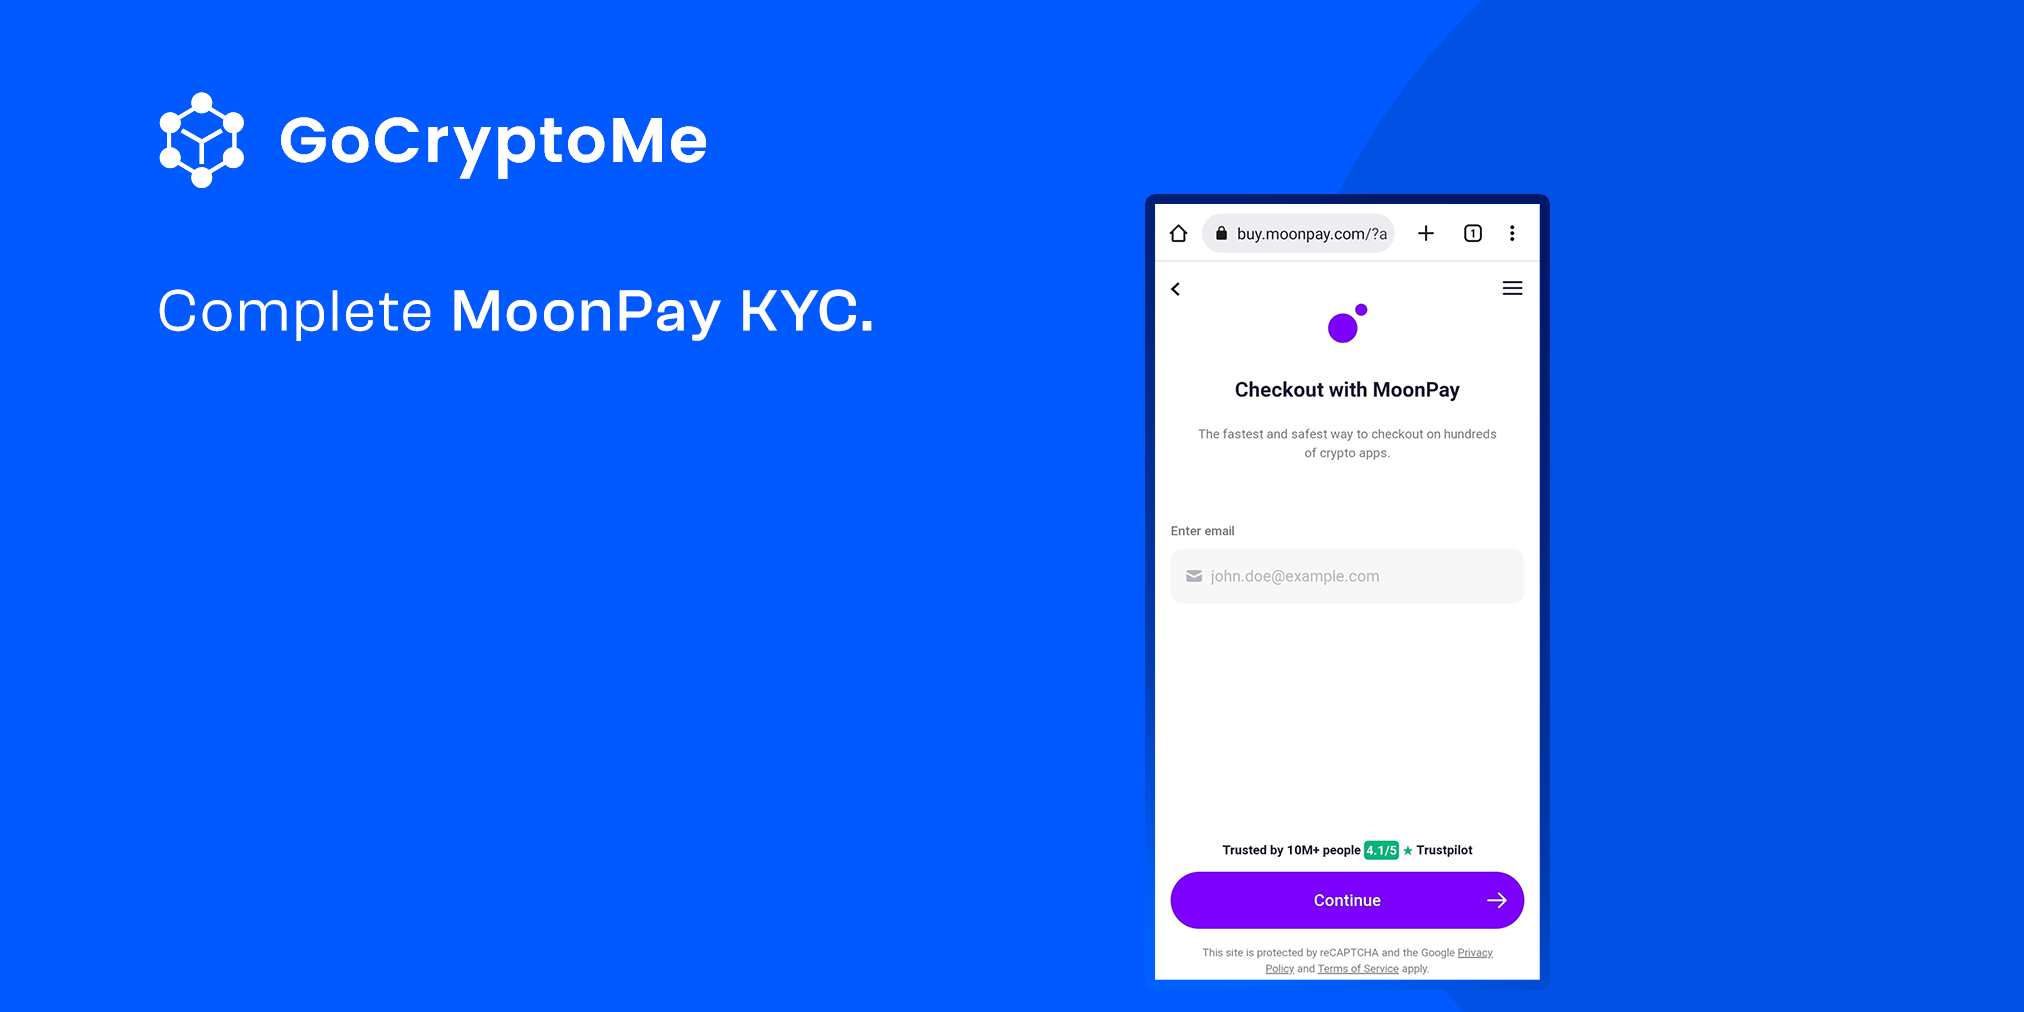
You’ll be given a few different funding options. In this example, we’ll be using MoonPay. Moonpay is one of the most trusted on-ramp providers in the industry and supports transfer from over 145 countries. Click ‘Continue to Moonpay’.
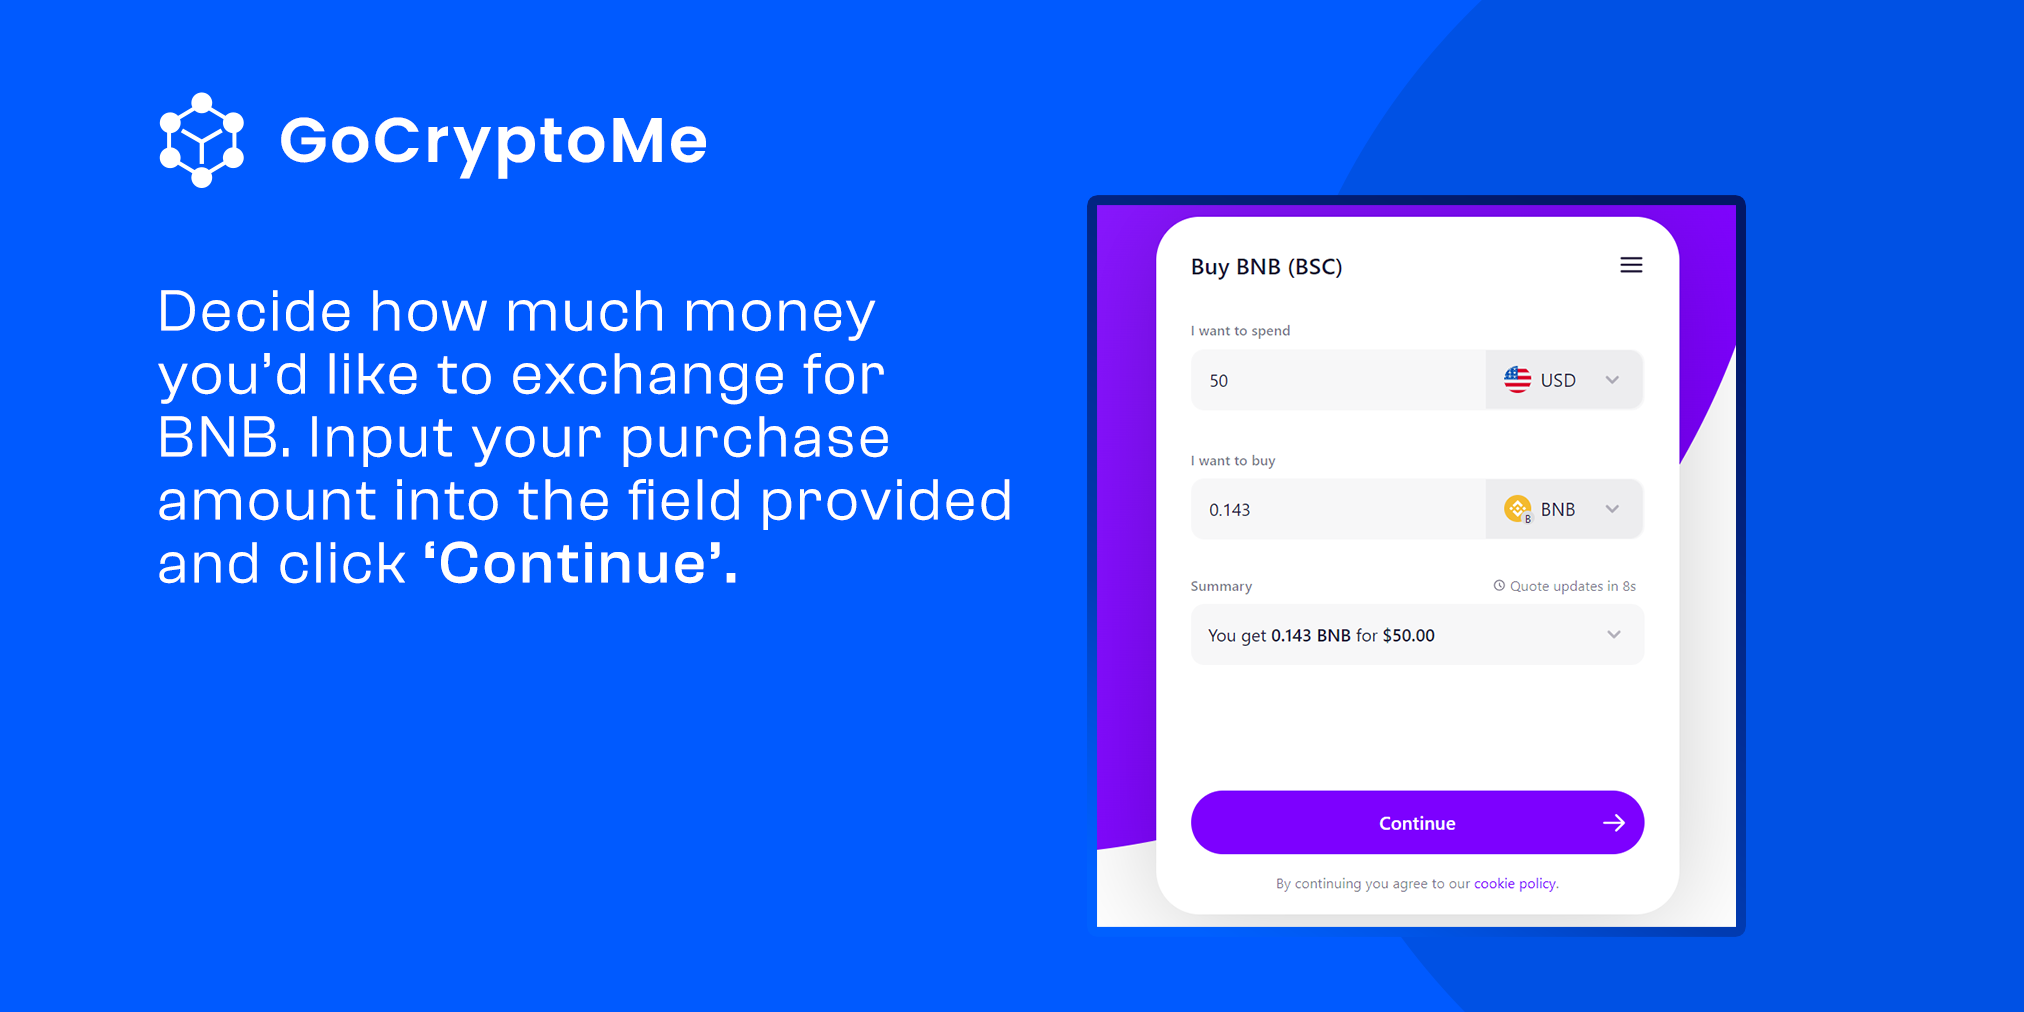
In the newly opened page, you decide how much money you’d like to exchange for BNB. Input your purchase amount into the field provided and click ‘Continue’.
Step 3: Complete MoonPay KYC
Next, you’ll be prompted to provide an Email Address. Type in an email address and wait a few seconds to receive a verification code.
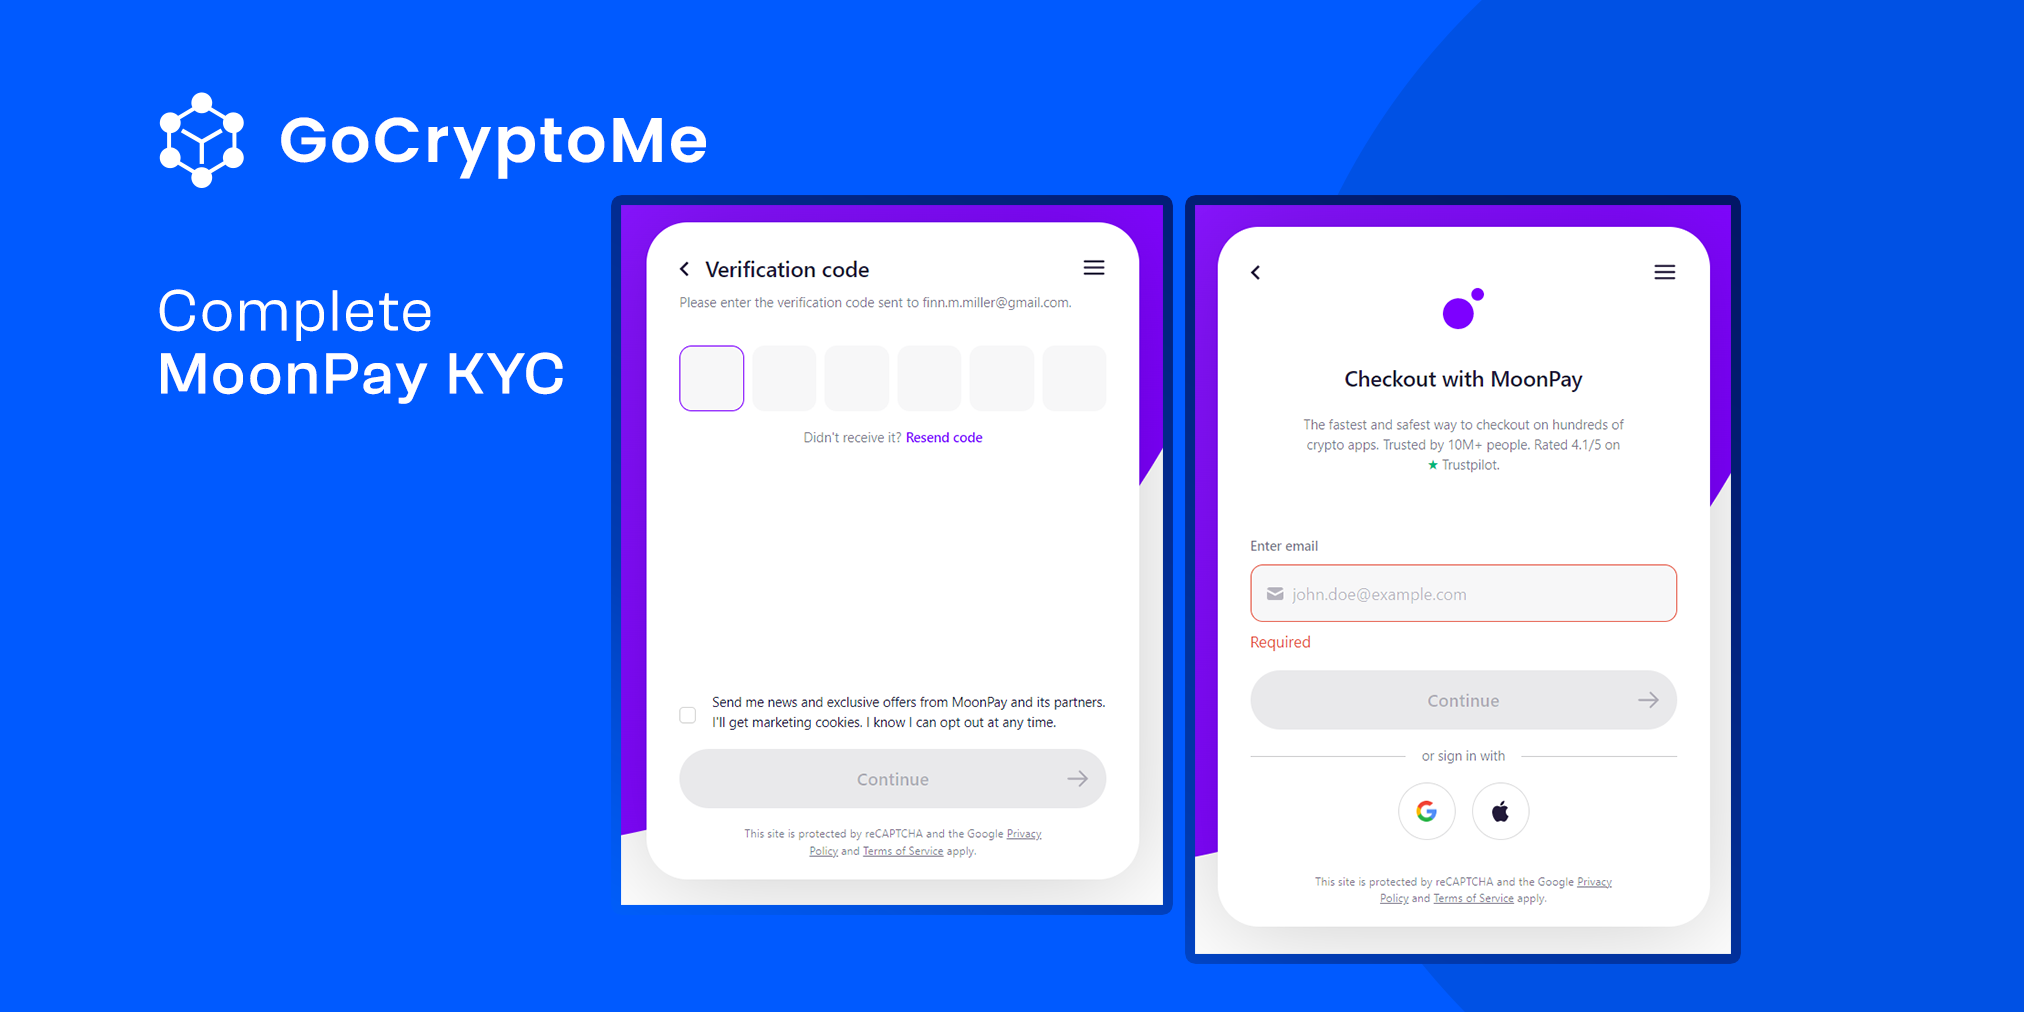
After you’ve received your verification code, copy the six digit code into the boxes provided and click ‘Continue’.
Before MoonPay will complete your payment, you’ll need to complete a quick KYC (Know Your Customer) verification process. This is a one-time procedure that should only take 2 minutes. Once completed, you’ll be able to skip this step for any future MoonPay payments. During the KYC process, MoonPay will ask only for a selfie and ID, like a passport or Drivers Licence.
When you are ready and have your documents prepared, click ‘Continue’.
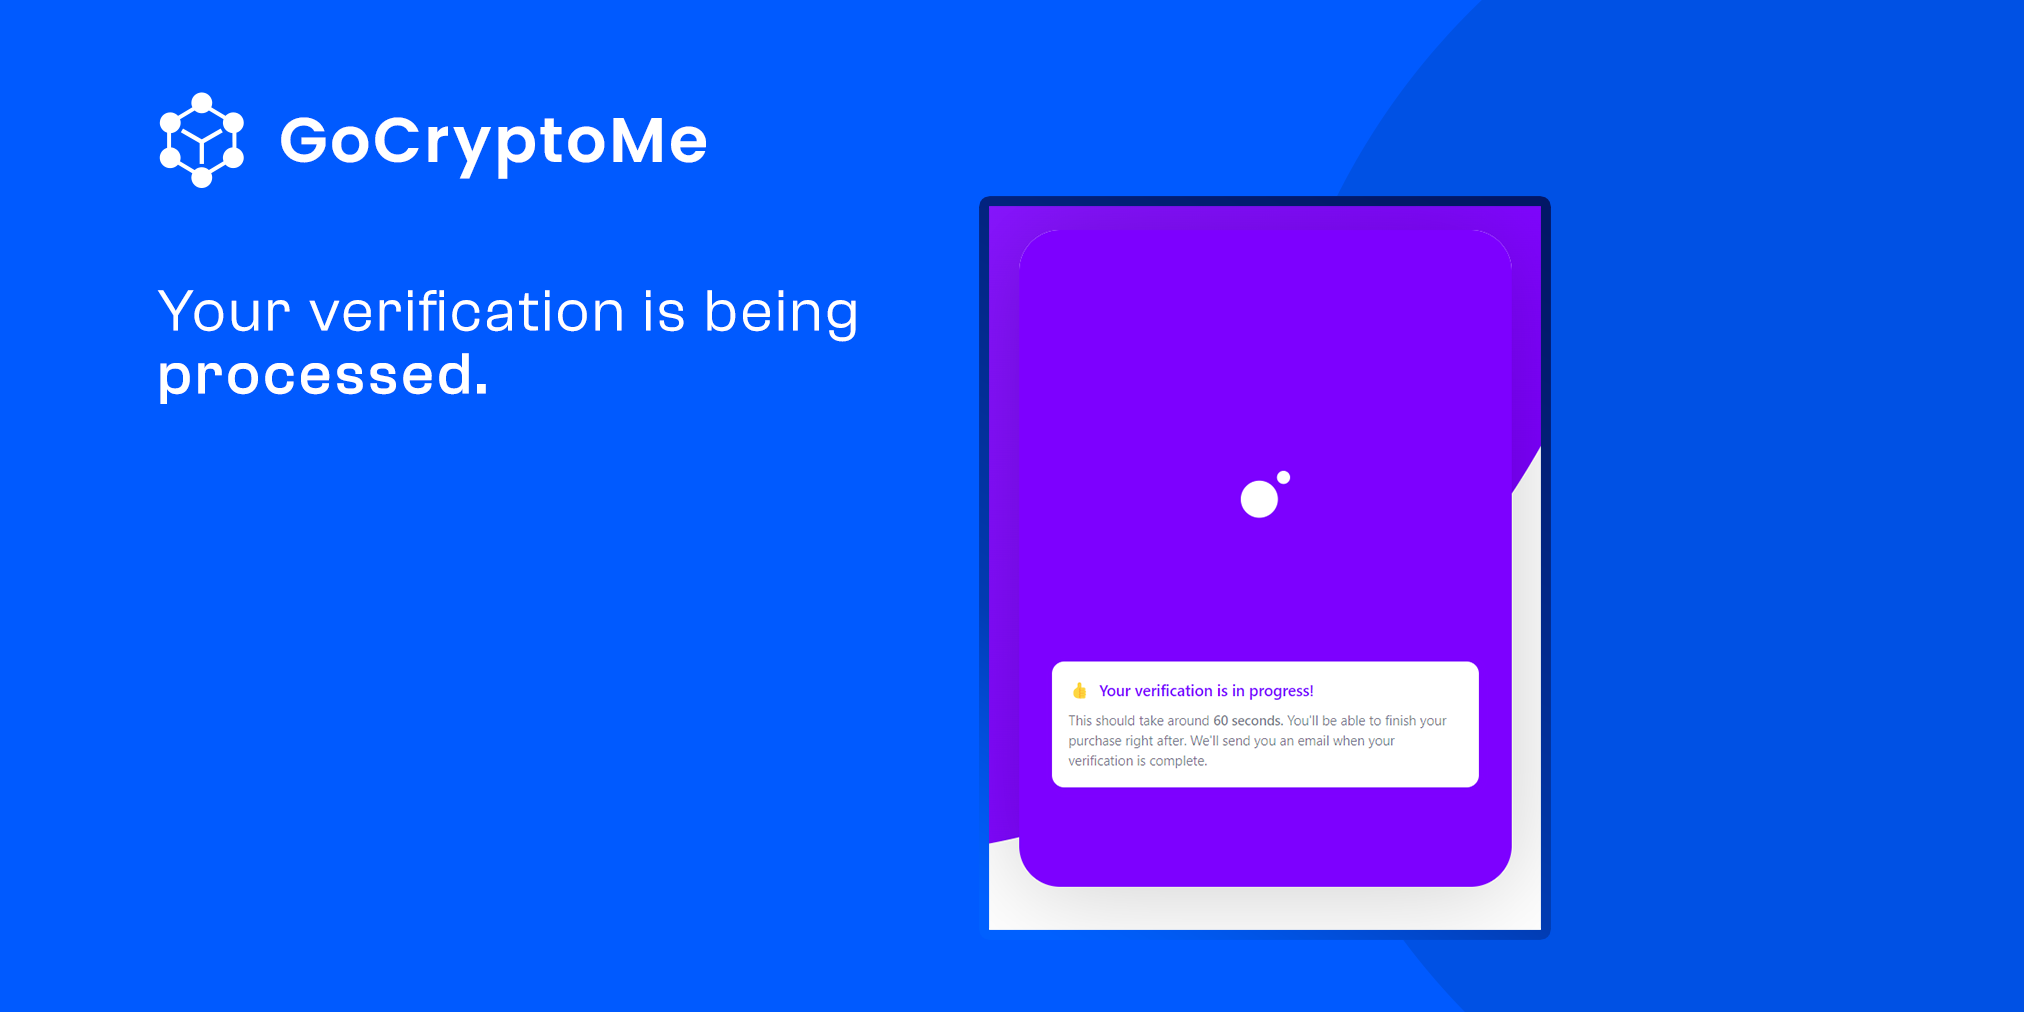
After completing the prompts and provided the requested documents, you should see the following screen:
This means your verification is being processed and shouldn’t take longer than 1-2 minutes.
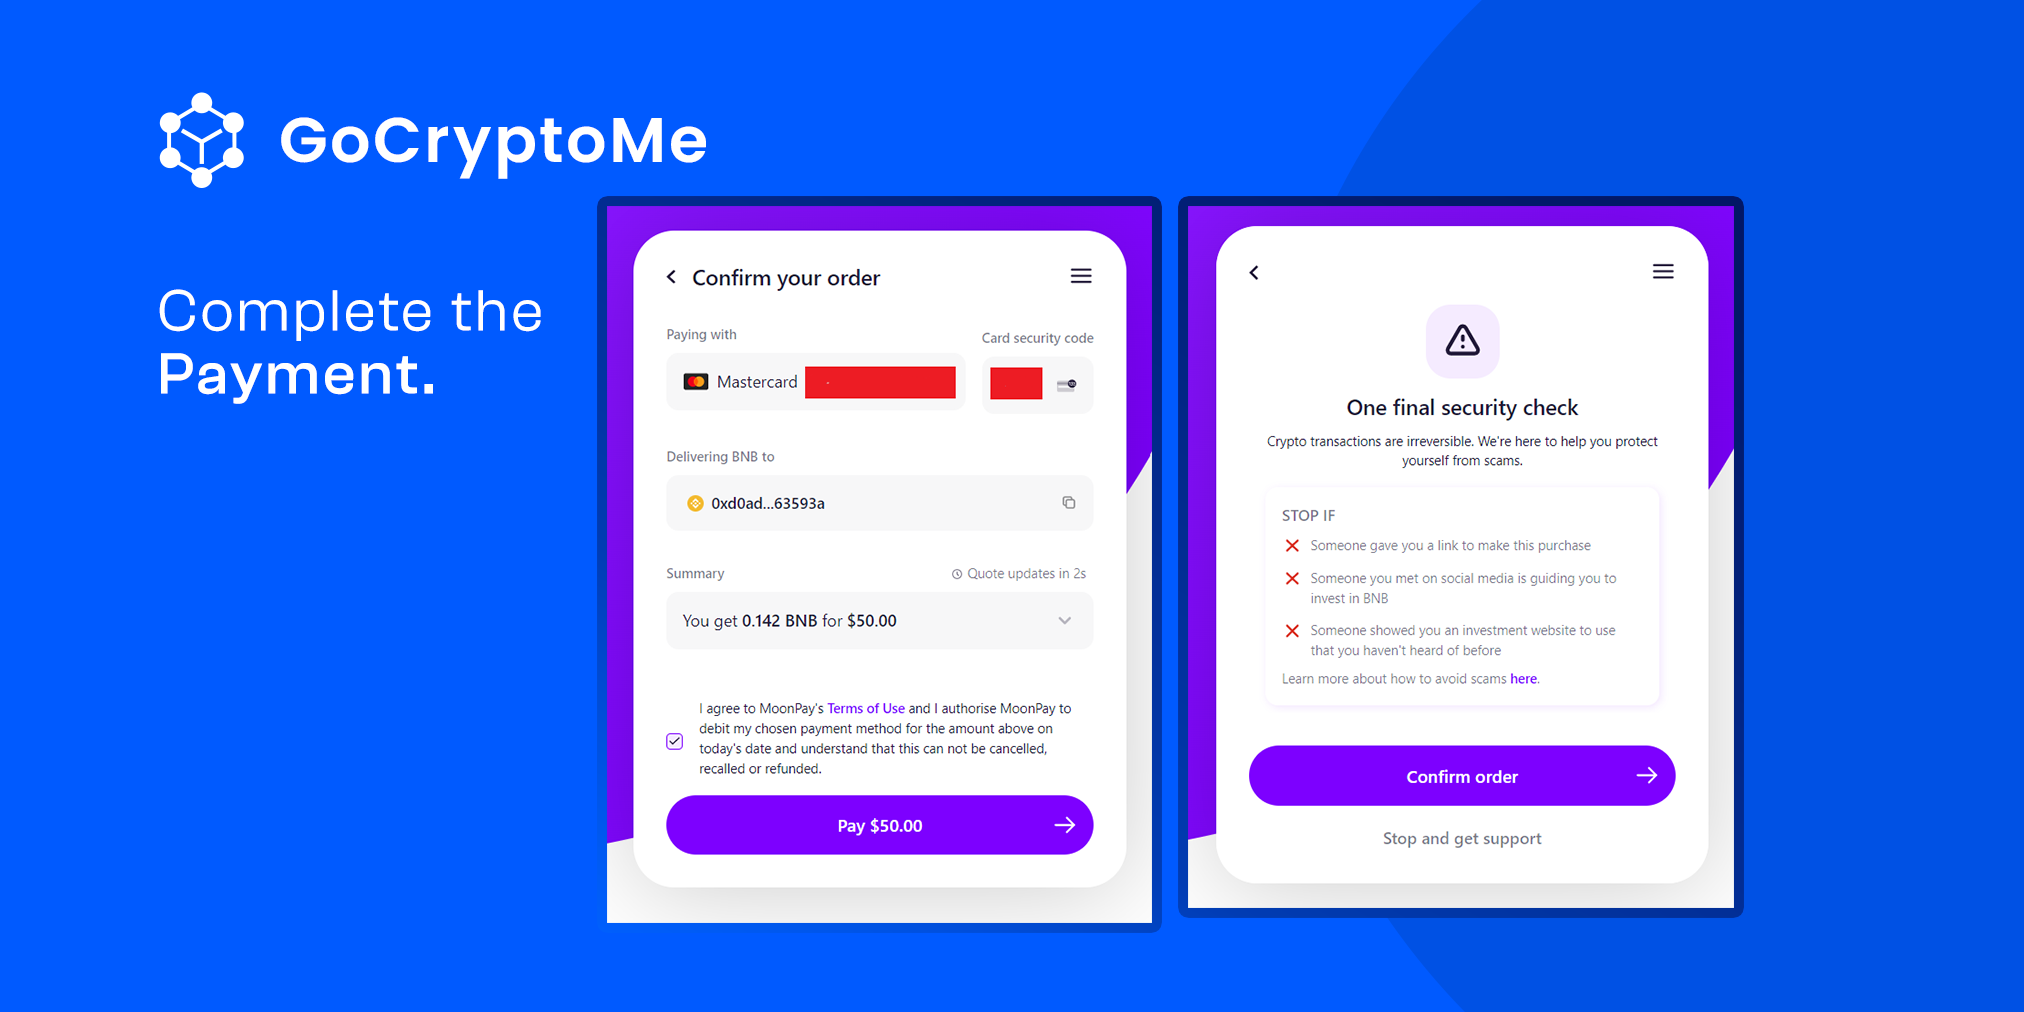
Step 4: Complete Payment
After the verification is complete, you’ll receive an email notifying you and you’ll be redirected to the final payment screen to provide your card details.

After inputting your card details, hit ‘Pay’ and confirm your order one final time. Your Credit Card provider may want to verify the transaction via an SMS message or through an associated app.
Once the payment has been completed, your wallet will be funded with the purchased BNB. From there you’ll be ready to dive into the world of decentralized finance and make instant, anonymous donations to a wide variety of charitable campaigns on GoCryptoMe.
How to Fund Your TrustWallet Crypto Wallet Using a Credit Card
One of the biggest benefits of using TrustWallet is that the mobile app comes with several popular blockchain networks pre-configured to make it easier than ever to get started using crypto. This means you can go straight into buying BNB without needing to add the Binance Smart Chain network to your wallet.
Step 1: Prepare your BNB Purchase
The GoCryptoMe Charitable Crowdfunding platform is available on the Binance Smart Chain, one of the industry’s largest and most commonly used blockchains. Whenever you send money to a friend or family member using the Binance Smart Chain, you’ll need to pay a small transaction fee in BNB. This is needed to ensure that the network functions properly and should never cost more than a few cents.
From the Homepage of the TrustWallet App, tap ‘Buy’, then tap BNB Smart Chain from the list of cryptocurrencies available for purchase.
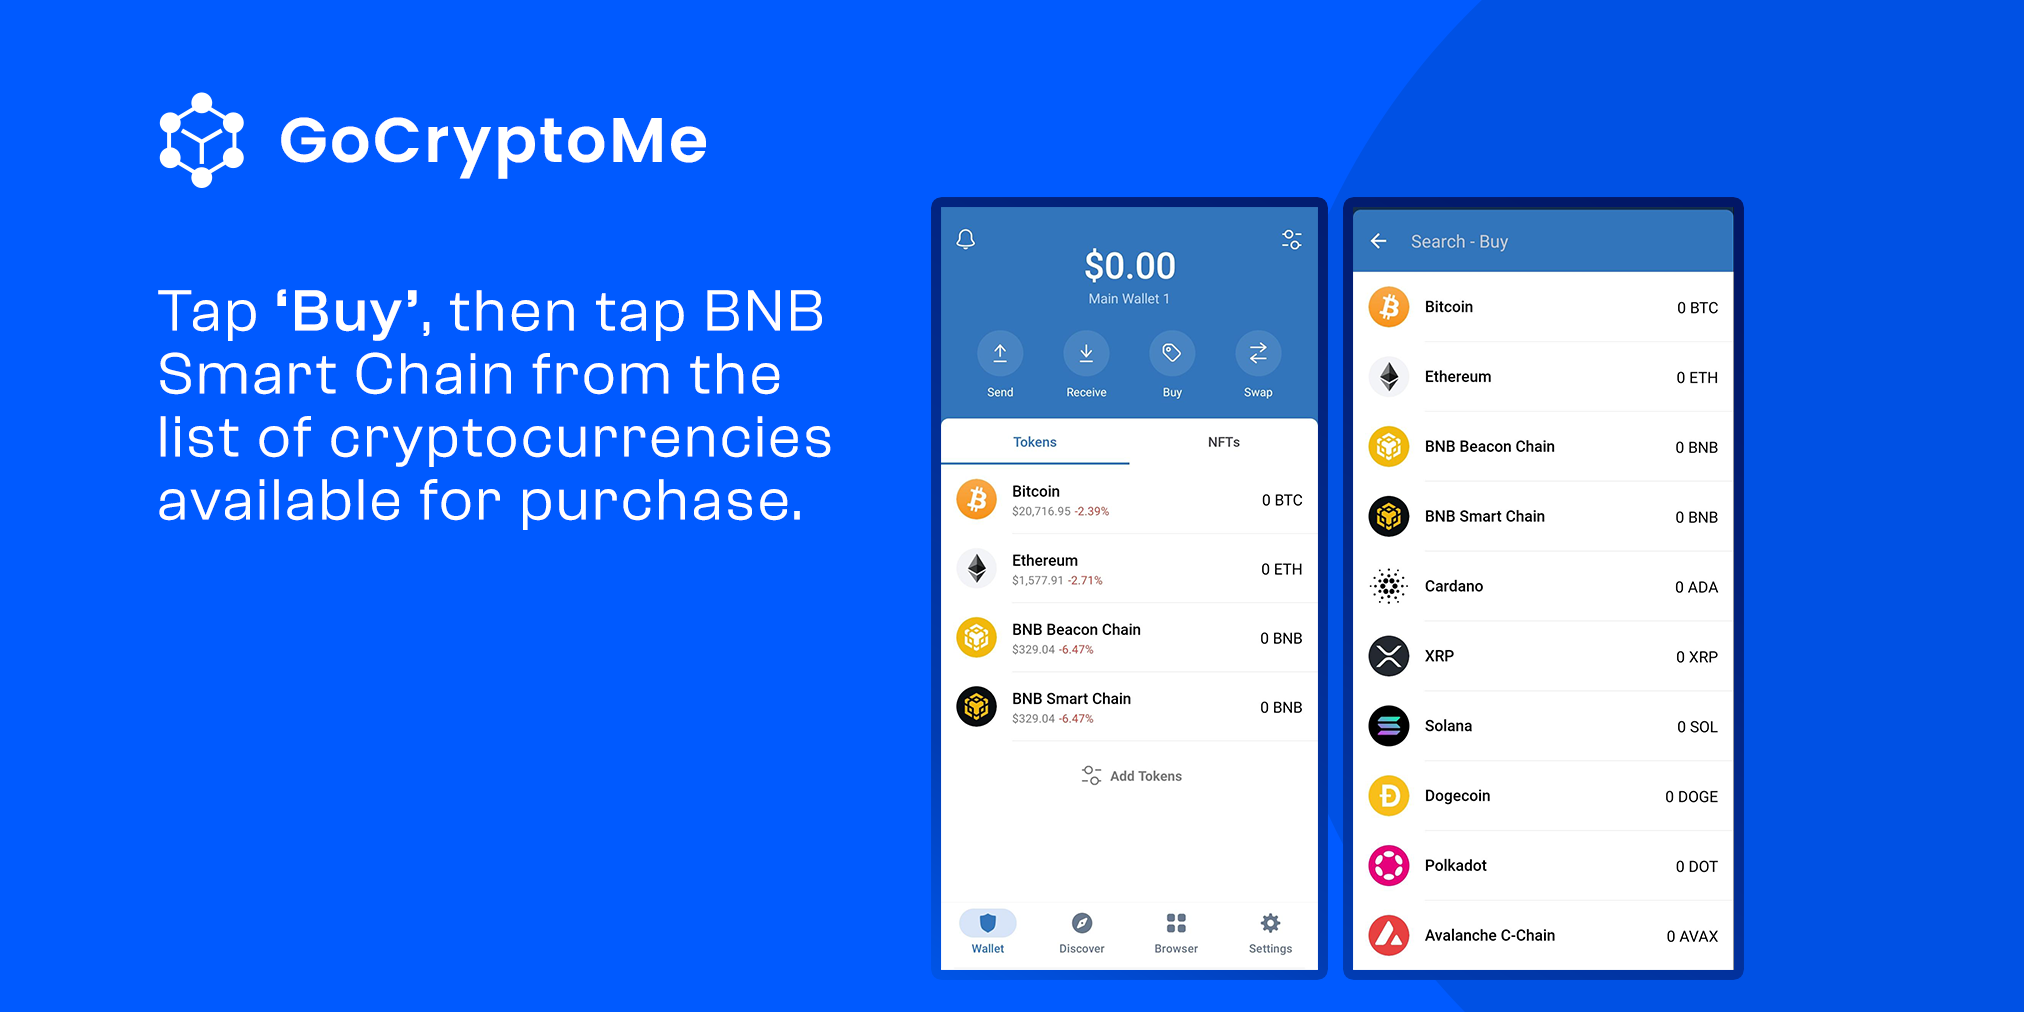
(Note: Please ensure you select BNB Smart Chain, not BNB Beacon Chain as this will result in you receiving BNB on a different network.)
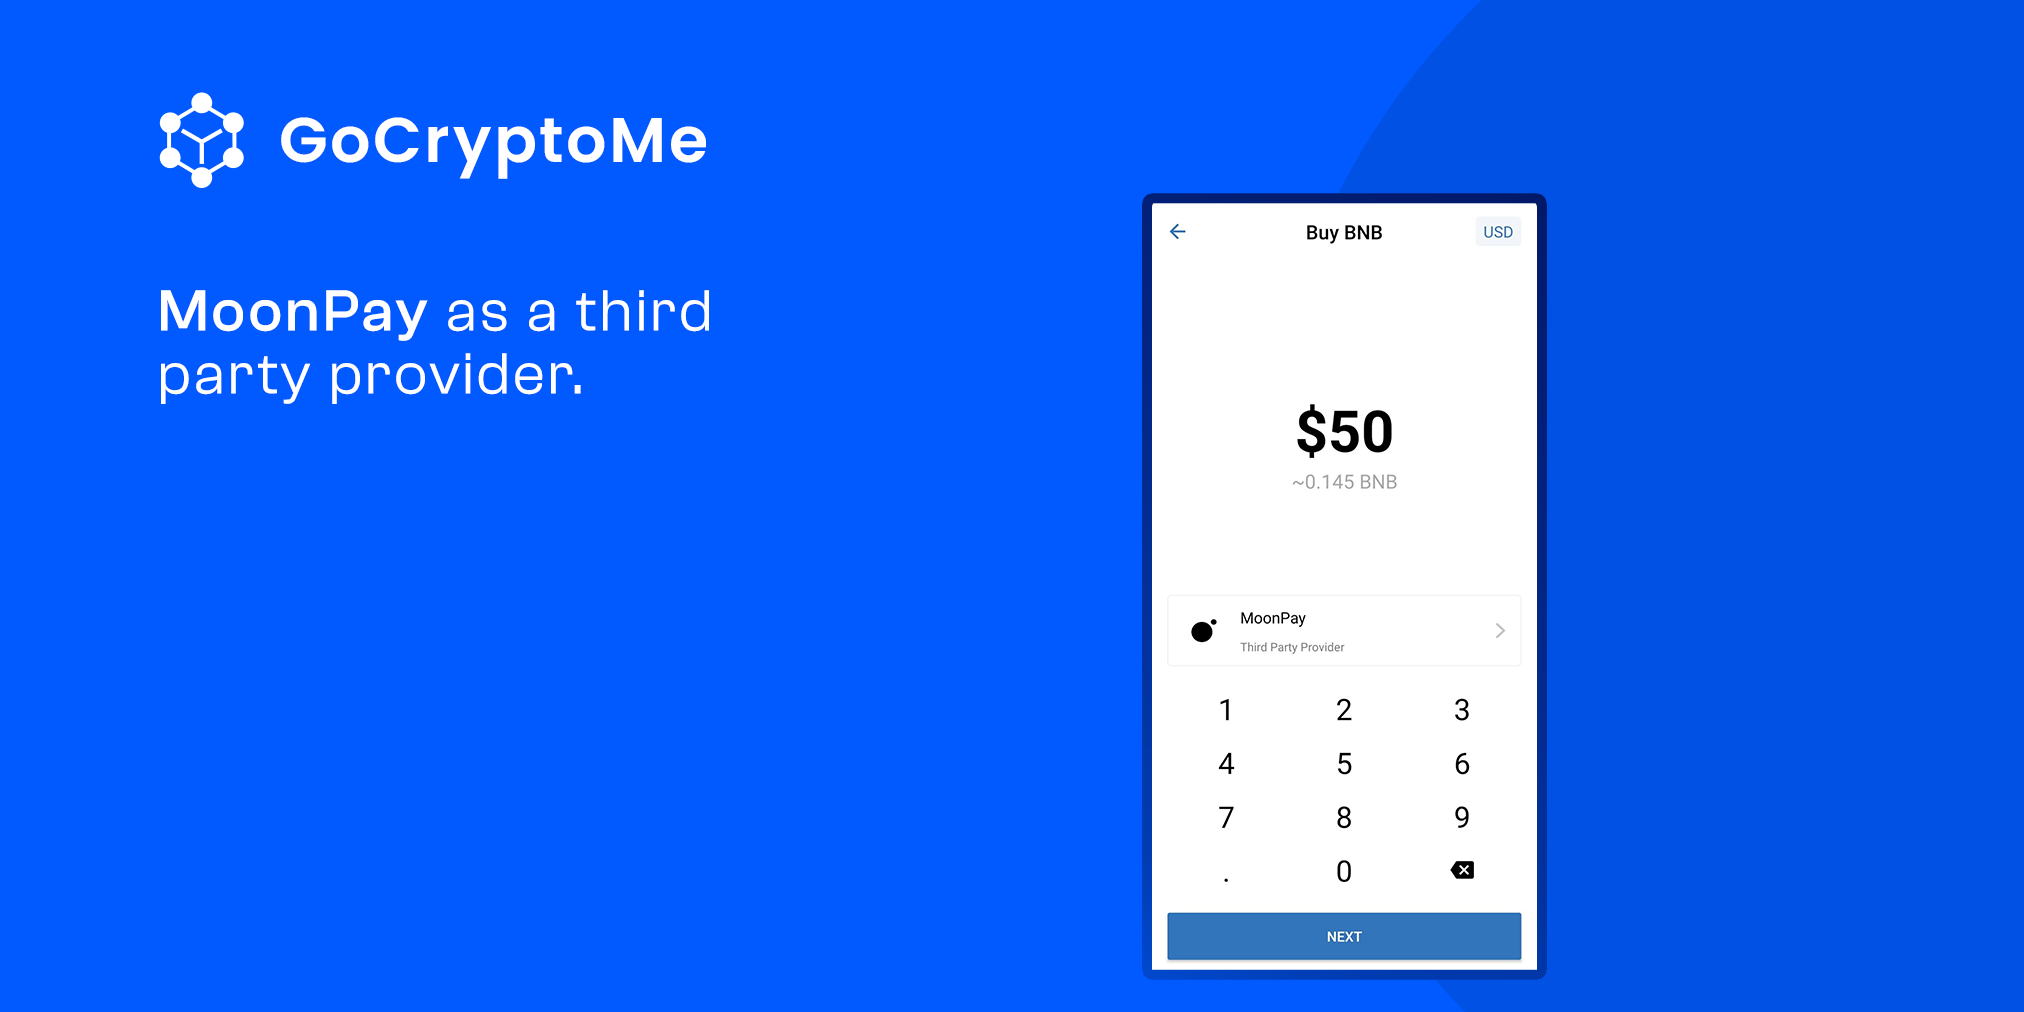
On the next screen, input the amount of money you’d like to exchange for BNB, then double check you’ve chosen MoonPay as a third party provider and tap ‘Next’. MoonPay is one of the most well-reputed on ramps for buying cryptocurrency.
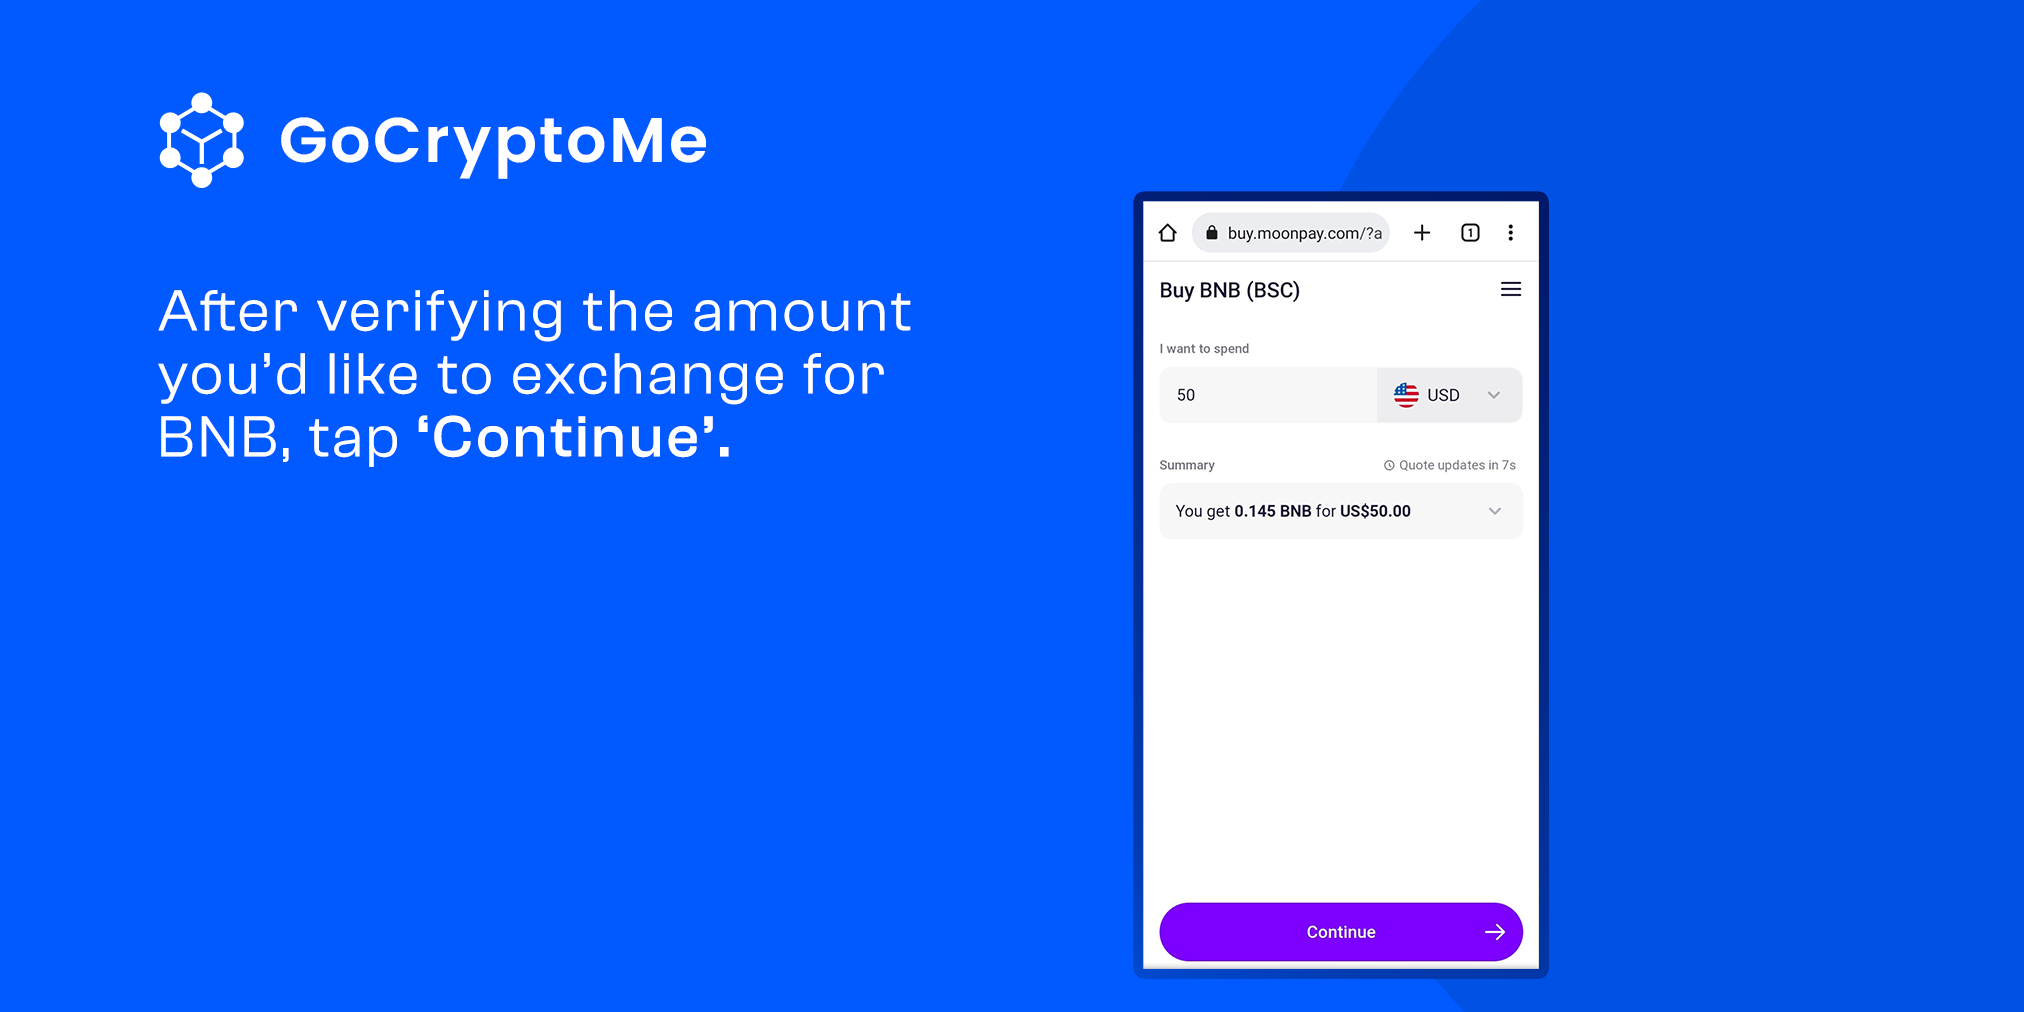
From here, you’ll be redirected to the MoonPay website where you’ll be asked to reconfirm your purchase amount. After verifying the amount you’d like to exchange for BNB, tap ‘Continue’.
Step 2: Complete MoonPay KYC
Next, you’ll be asked to provide an email address. After typing in your email address, press ‘Continue’.
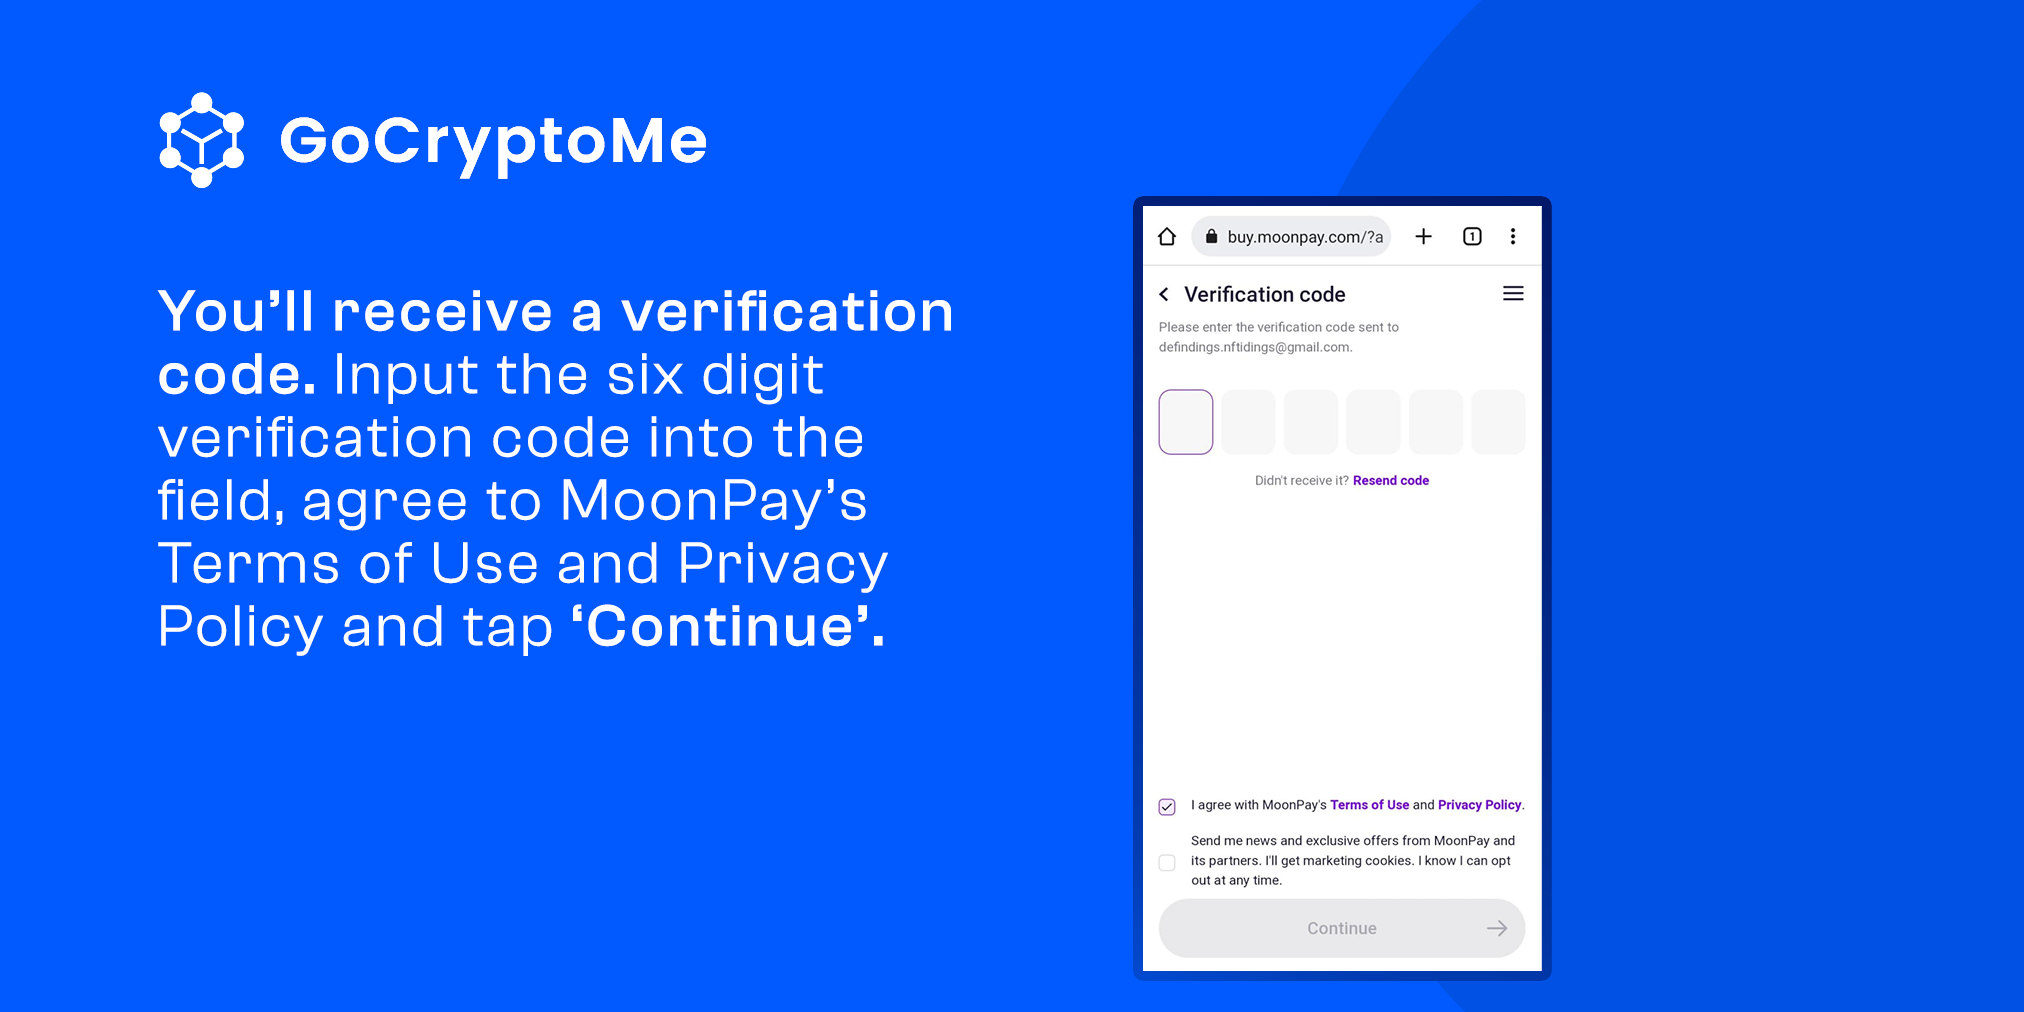
After a few seconds, you’ll receive a verification code. Input the six digit verification code into the field, agree to MoonPay’s Terms of Use and Privacy Policy and tap ‘Continue’ again.
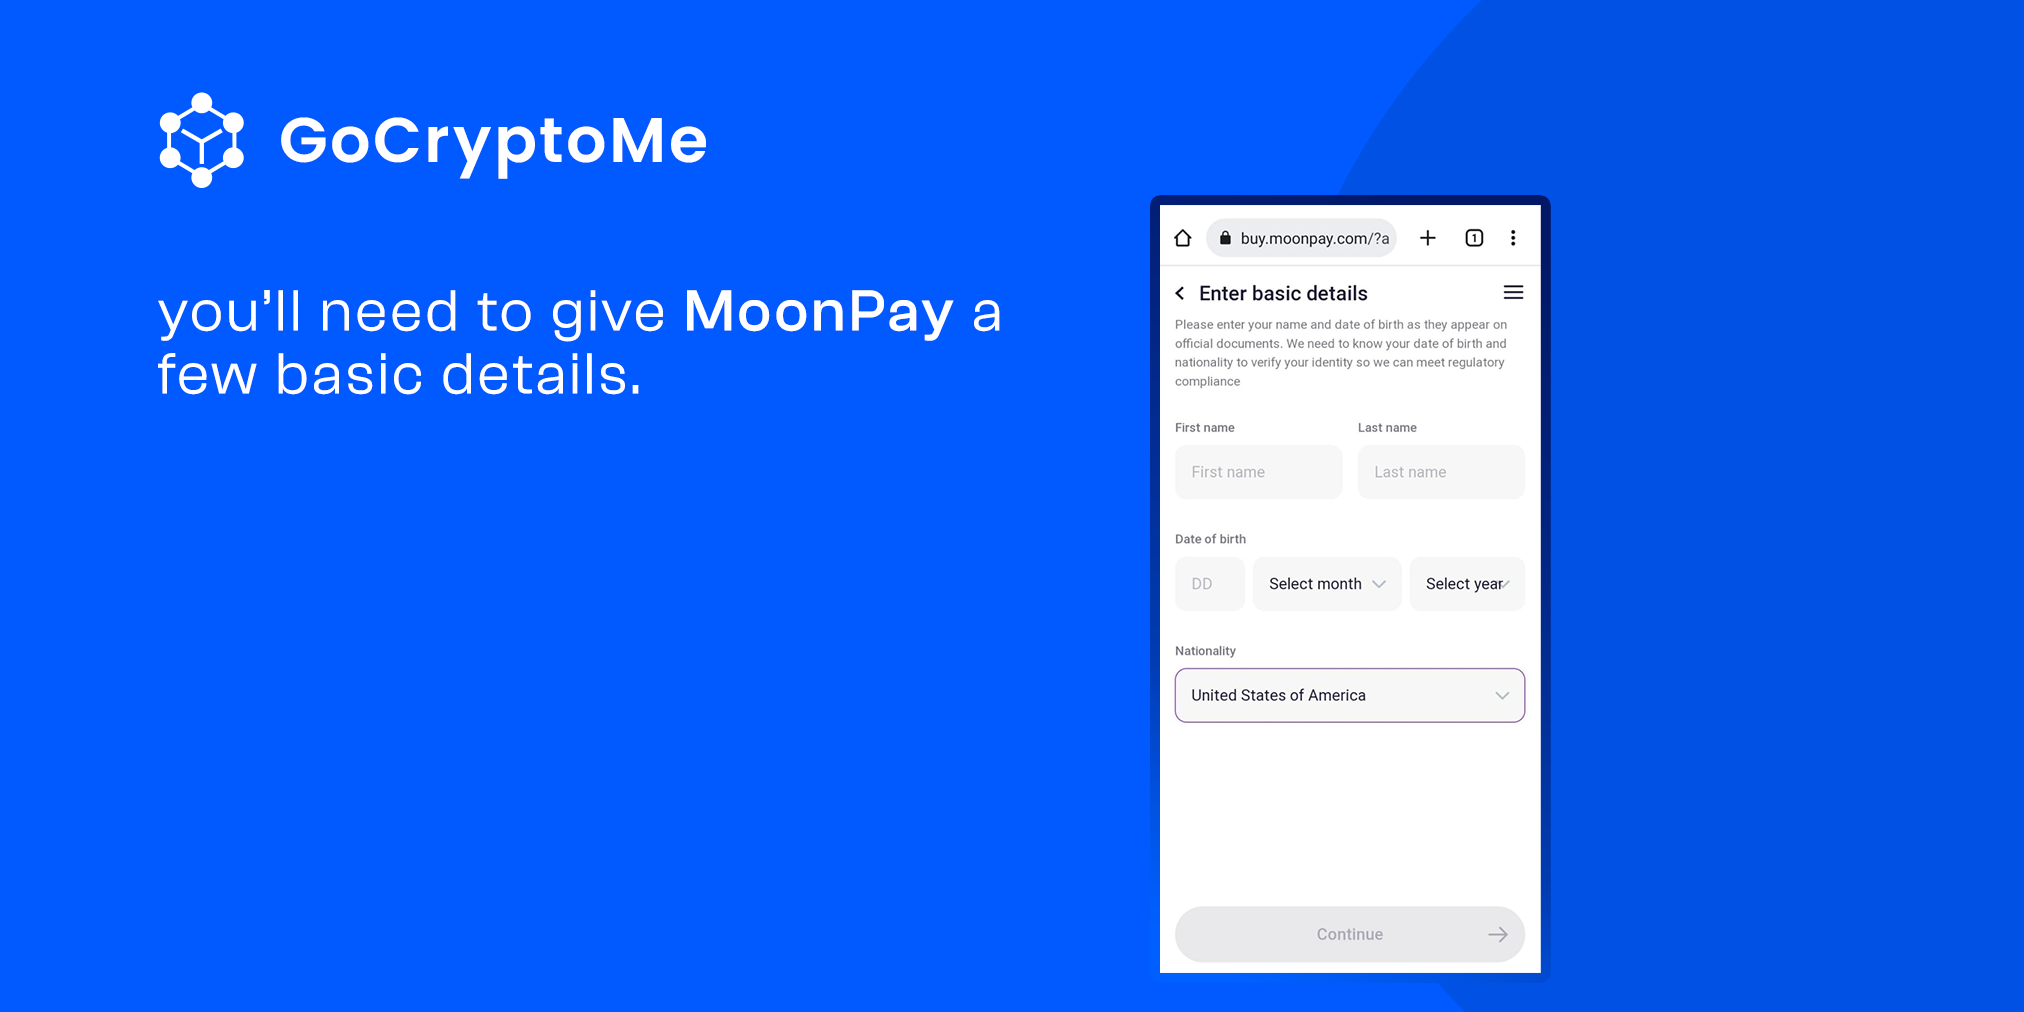
Then, you’ll need to give MoonPay a few basic details such as your name and date of birth. Please note this is just a one-off event, and anytime you need to use MoonPay in the future the platform will recognise your profile. Fill out the required fields with your details and press ‘Continue’.
After your details have been accepted, you’ll be prompted to give your card details and complete the final KYC (Know Your Customer) procedures. This typically means taking a quick selfie and uploading some basic identification like a Passport or a Driver’s Licence.
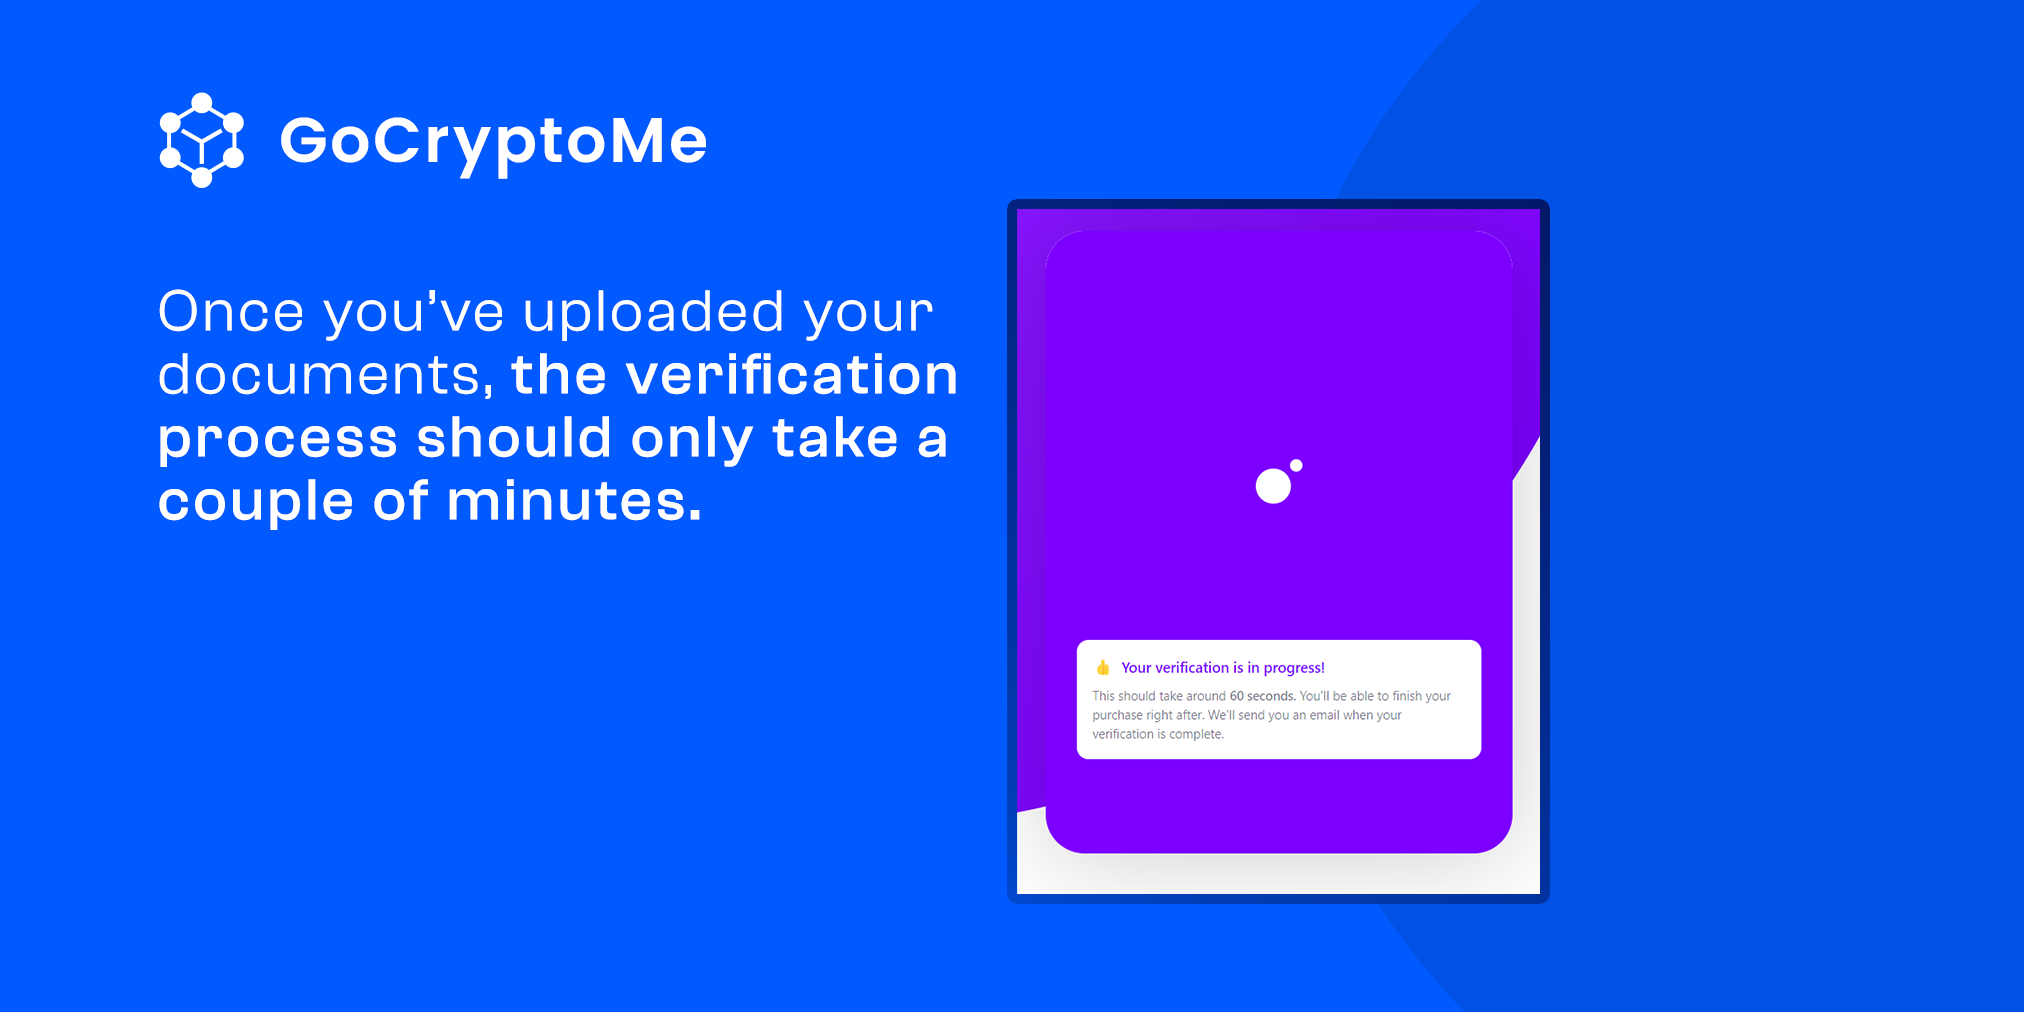
Once you’ve uploaded your documents, the verification process should only take a couple of minutes.
Step 3: Complete Payment
Once your KYC verification has been accepted and you’ve received the confirmation email, you’ll be taken to a final confirmation screen to confirm your BNB purchase.
Click ‘Pay’ to process the purchase. You may be contacted by your card provider asking if you have authrorized the transaction, simply confirm that you have requested to make this purchase and your provider will confirm your request.
After MoonPay has received the transaction, your freshly ordered BNB will be deposited to your TrustWallet account. Now you’ll be able to browse the various Charitable Campaigns raising funds through the GoCryptoMe Crowdfunding platform and make instant, anonymous donations to those in need.
What Are Some Other Ways to Fund a Crypto Wallet?
While funding your crypto wallet with a credit card with providers like MoonPay is probably the easiest and fastest way to get cryptocurrency like BNB in your wallet, there are plenty of other methods. If you have a friend or family member who already holds some crypto, you could get them to send it to you directly just using your wallet address.
Alternatively, you could sign up to a centralized exchange like Binance or Coinbase and withdraw cryptocurrencies to your wallet from there. To find out more about how to sign up to an exchange, as well as compare the top tier exchanges in the crypto industry, please check out this guide.
Helpful Links:
Site: charity.gocryptome.io
Twitter: twitter.com/gocryptomeapp
Telegram: t.me/GoCryptoMe